🔧 Upgrade Your 3D Printing Game!
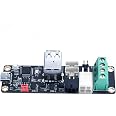
The BIGTREETECH EBB36 CAN Bus Adapter Board is a cutting-edge solution for 3D printing enthusiasts, featuring advanced communication options, enhanced security measures, and a user-friendly design that supports a variety of applications, including filament break detection and custom expansions.
A**R
Great Product
Removed artifact in on my prints and made my machine run quieter. Now it’s the fans I hear instead of the frame humming. Was easy to configure and setup.
C**L
Big Tree ADXL
Item arrived on time in excellent condition.
M**N
Works great.
This is the 3rd one I have purchased and they all work. I use USB connection instead of can communication. GitHub repository has been reworked and is a lot easier to read and understand than it used to be. Good luck.
C**W
Excellent way to build a fully integrated print head - but difficult/confusing setup process
For my Zero G Mercury One CoreXY build it was my ambition to run CANBUS to my print head, primarily to avoid having to install a thick umbilical to provide the discrete sensor and control data. This solution by BigTreeTech pairs nicely with my Manta M8P mainboard which already has CANBUS IO. In addition, I selected the EBB36 version as I was running a pancake Nema 14 stepper motor.The difficulties I had included flashing the right Klipper firmware to both boards, and then the power-up sequence to get them to recognize one another on the CANBUS and "shake hands". KB3D Wiki is a great resource in getting this working.Ultimately, it took several attempts before I got a stable and consistent connection between the two boards, but it now works. Many argue that the accelerometer data generated by input shaping needs high bandwidth to calculate a good result, but I have noticed that running your CANBUS on 500k bus speed is sufficient for all your needs.I would also caution you to provide proper strain relief for the umbilical so that you don't pull the connector from the solder pads on the board.Still highly recommended! But setup is not for the faint of heart!
E**O
Easy entry to CANBus for FDM printers
I had to redo the wiring on my Ender 3 after making some major upgrades - moved to direct drive from a remote feed system, including an Orbiter - and had some REALLY long wire runs back to my control boards. I run Klipper so the option of using only four wires to bring all my hot end controls back to my Raspberry Pi sounded great. I mounted this on a point behind my print head as the board will not fit on the back of the NEMA14 motor like it would on a NEMA17. It did take a bit of programming work to get the CANBus set up in my printer config but now it is controlling the following: two fans, extruder motor, extruder heater, BLTouch, hotend LED and filament runout sensor.
J**G
Well made CAN board toolhead
Performs like you would expect from the board. I had no issues with the EBB36.
E**8
There are better options, go with anything else
I have been through so many of these boards, either from them failing in incredibly short order or showing up DOA. Its incredibly frustrating to try and print something, only to get random failures for no reason. Losses in connection with the MCU, random overload issues, loss in heating, fan MOSFETs burning out, you name it and it'll happen. I think my record for keeping one of these alive is something like 4 months, that is absolutely unacceptable
K**M
Made input shaper a sinch
I tried using a standard accelerometer to run input shaper but ran into a lot of issues getting it to work with my RPI. Using the USB interface and the onboard MCU made this SOOOOO much easier. 10 out of 10 recommend this product for anyone looking to run input shaper. The manual method is completely useless IMO.
Trustpilot
2 months ago
2 months ago